Testing
9 min read
- Authors
- Name
- Karan Pratap Singh
- @karan_6864


Table of Contents
In this tutorial, we will talk about testing in Go. So, let's start using a simple example.
We have created a math package that contains an Add function Which as the name suggests, adds two integers.
package math

func Add(a, b int) int {
	return a + b
}
It's being used in our main package like this.
package main

import (
	"example/math"
	"fmt"
)

func main() {
	result := math.Add(2, 2)
	fmt.Println(result)
}
And, if we run this, we should see the result.
$ go run main.go
4
Now, we want to test our Add function. So, in Go, we declare test files with _test suffix in the file name. So for our add.go, we will create a test as add_test.go. Our project structure should look like this.
.
├── go.mod
├── main.go
└── math
    ├── add.go
    └── add_test.go
We will start by using a math_test package, and importing the testing package from the standard library. That's right! Testing is built into Go, unlike many other languages.
But wait...why do we need to use math_test as our package, can't we just use the same math package?
Well yes, we can write our test in the same package if we wanted, but I personally think doing this in a separate package helps us write tests in a more decoupled way.
Now, we can create our TestAdd function. It will take an argument of type testing.T which will provide us with helpful methods.
package math_test

import "testing"

func TestAdd(t *testing.T) {}
Before we add any testing logic, let's try to run it. But this time, we cannot use go run command, instead, we will use the go test command.
$ go test ./math
ok      example/math 0.429s
Here, we will have our package name which is math, but we can also use the relative path ./... to test all packages.
$ go test ./...
?       example [no test files]
ok      example/math 0.348s
And if Go doesn't find any test in a package, it will let us know.
Perfect, let's write some test code. To do this, we will check our result with an expected value and if they do not match, we can use the t.Fail method to fail the test.
package math_test

import "testing"

func TestAdd(t *testing.T) {
	got := math.Add(1, 1)
	expected := 2

	if got != expected {
		t.Fail()
	}
}
Great! Our test seems to have passed.
$ go test math
ok      example/math    0.412s
Let's also see what happens if we fail the test, for that, we can simply change our expected result.
package math_test

import "testing"

func TestAdd(t *testing.T) {
	got := math.Add(1, 1)
	expected := 3

	if got != expected {
		t.Fail()
	}
}
$ go test ./math
ok      example/math    (cached)
If you see this, don't worry. For optimization, our tests are cached. We can use the go clean command to clear our cache and then re-run the test.
$ go clean -testcache
$ go test ./math
--- FAIL: TestAdd (0.00s)
FAIL
FAIL    example/math    0.354s
FAIL
So, this is what a test failure will look like.
Table driven tests
This brings us to table-driven tests. But what exactly are they?
So earlier, we had function arguments and expected variables which we compared to determine if our tests passed or fail. But what if we defined all that in a slice and iterate over that? This will make our tests a little bit more flexible and help us run multiple cases easily.
Don't worry, we will learn this by example. So we will start by defining our addTestCase struct.
package math_test

import (
	"example/math"
	"testing"
)

type addTestCase struct {
	a, b, expected int
}

var testCases = []addTestCase{
	{1, 1, 3},
	{25, 25, 50},
	{2, 1, 3},
	{1, 10, 11},
}

func TestAdd(t *testing.T) {

	for _, tc := range testCases {
		got := math.Add(tc.a, tc.b)

		if got != tc.expected {
			t.Errorf("Expected %d but got %d", tc.expected, got)
		}
	}
}
Notice, how we declared addTestCase with a lower case. That's right we don't want to export it as it's not useful outside our testing logic. Let's run our test.
$ go run main.go
--- FAIL: TestAdd (0.00s)
    add_test.go:25: Expected 3 but got 2
FAIL
FAIL    example/math    0.334s
FAIL
Seems like our tests broke, let's fix them by updating our test cases.
var testCases = []addTestCase{
	{1, 1, 2},
	{25, 25, 50},
	{2, 1, 3},
	{1, 10, 11},
}
Perfect, it's working!
$ go run main.go
ok      example/math    0.589s
Code coverage
Finally, let's talk about code coverage. When writing tests, it is often important to know how much of your actual code the tests cover. This is generally referred to as code coverage.
To calculate and export the coverage for our test, we can simply use the -coverprofile argument with the go test command.
$ go test ./math -coverprofile=coverage.out
ok      example/math    0.385s  coverage: 100.0% of statements
Seems like we have great coverage. Let's also check the report using the go tool cover command which gives us a detailed report.
$ go tool cover -html=coverage.out

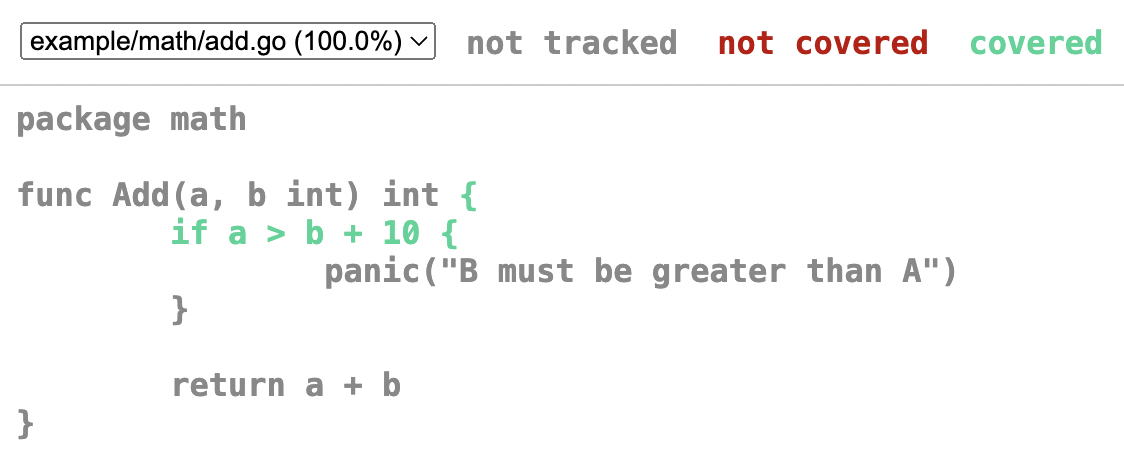
As we can see, this is a much more readable format. And best of all, it is built right into standard tooling.
Fuzz testing
Lastly, let's look at fuzz testing which was introduced in Go version 1.18.
Fuzzing is a type of automated testing that continuously manipulates inputs to a program to find bugs.
Go fuzzing uses coverage guidance to intelligently walk through the code being fuzzed to find and report failures to the user.
Since it can reach edge cases that humans often miss, fuzz testing can be particularly valuable for finding bugs and security exploits.
Let's try an example:
func FuzzTestAdd(f *testing.F) {
	f.Fuzz(func(t *testing.T, a, b int) {
		math.Add(a , b)
	})
}
If we run this, we'll see that it'll automatically create test cases. Because our Add function is quite simple, tests will pass.
$ go test -fuzz FuzzTestAdd example/math
fuzz: elapsed: 0s, gathering baseline coverage: 0/192 completed
fuzz: elapsed: 0s, gathering baseline coverage: 192/192 completed, now fuzzing with 8 workers
fuzz: elapsed: 3s, execs: 325017 (108336/sec), new interesting: 11 (total: 202)
fuzz: elapsed: 6s, execs: 680218 (118402/sec), new interesting: 12 (total: 203)
fuzz: elapsed: 9s, execs: 1039901 (119895/sec), new interesting: 19 (total: 210)
fuzz: elapsed: 12s, execs: 1386684 (115594/sec), new interesting: 21 (total: 212)
PASS
ok      foo 12.692s
But if we update our Add function with a random edge case such that the program will panic if b + 10 is greater than a.
func Add(a, b int) int {
	if a > b + 10 {
		panic("B must be greater than A")
	}

	return a + b
}
And if we re-run the test, this edge case will be caught by fuzz testing.
$ go test -fuzz FuzzTestAdd example/math
warning: starting with empty corpus
fuzz: elapsed: 0s, execs: 0 (0/sec), new interesting: 0 (total: 0)
fuzz: elapsed: 0s, execs: 1 (25/sec), new interesting: 0 (total: 0)
--- FAIL: FuzzTestAdd (0.04s)
    --- FAIL: FuzzTestAdd (0.00s)
        testing.go:1349: panic: B is greater than A
I think this is a really cool feature of Go 1.18. You can learn more about fuzz testing from the official Go blog.